Sure. Get a Gimp (free open source), get a bit familiar with it, good start could be editing existing images and toying with effect and stuff.
You need to either use a reference (you can simply open an image in Gimp, add a new layer and start reproducing it) or you can try to come up with things straight from your head. That's what I always try to do. But this requires a lot of inspiration, pause a film during an intense scene rich on environment or just take a better look at that temple in your favorite RPG you passed 300 times before without noticing anything else but the fact that it's a temple and it's gray.
The technique I use is a pretty basic one, there are a lot better / advanced ones.
1,
canvas size - think about what you are about to draw. Landscape? Let it be wide. Very wide. Weary freaky claustrophobicaly looking picture with focus on one character? Definitely not wide, quite the opposite
2,
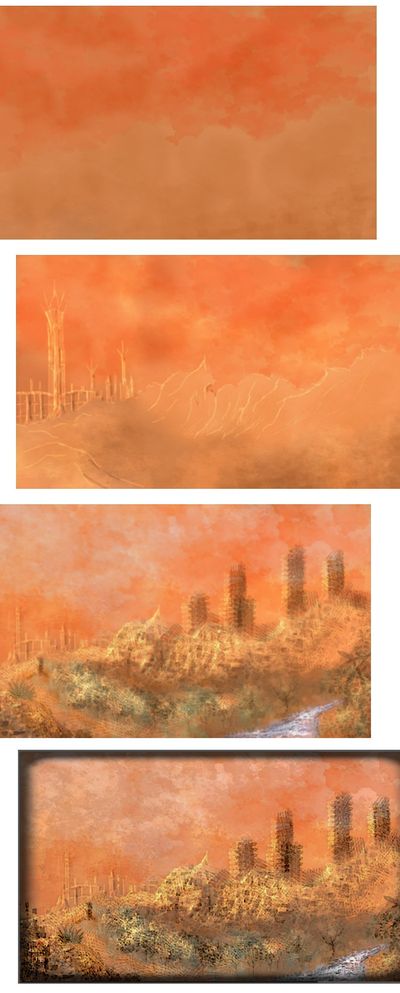
defining the base image structure. In order to start drawing envos(environments), you need that. Just basic shapes you will be adding details on. Don't start on white background no matter what you are doing. Not even snowy picture. Use huge brushes with low opacity. Lets say you want to draw a hot desert planet like I did. File / New, set resolution (like 1200 x 700 should be ok for starters) select an interesting tone of reddish warm yellow (not banana yellow that is) and use the fill tool to fill the entire canvas(image) with it. Now use huge brushes with low opacity and start defining. No details whatsoever at this stage. I do the sky already here at this point. You need to have desired composition and perspective in your head by now. By drawing sky, I define the overall composition of image. Then with these huge brushes with low opacity start defining the terrain. Make them over and over again, so the image gets some weight. Mountains, cliffs, whatever. Still no detail whatsoever. By now you should have a rough sky and the rest of picture filled with messy brushes you will later turn into something more detailed.
3,
defining the primary light source Talking about environments, that would be sun/moon. You NEED to know where it is. Not 100% precisely, but precisely enough. Pick a dodge/burn tool and start adding details with it. You are now about to create a basic lightning for your picture. Say the sun is to the left, left hill/mountain side you will lighten, the right one you make darker. You can create a lot of details at this stage. People who know what they are doing (sometimes, very occasionally even me) can create entire cities just by doing that. You should have a rough concept now. It must be obvious that that thing is a building and this is a hill by now.
4,
adding additional colors and details First things 1st. Get custom brushes. Get lots of them. The ones where you don't have to join the authors secret cult and eternally praise his name will be best. Google it, search DeviantART, whatever. Thinking about creating a detailed and rich environment with the basic round brush just hurts. Experiment with them. If a grass or cloud brush looks good on that mountain, good for you, use it. In this stage you get creative with brushwork and add more colors than the ones created by lightening and darkening our basic yellow. The colors you started with must stay dominant, or you lose the image integrity. Add a light grayish green with low opacity on your mountains. Add some gray or dark red and start creating some interesting textures. Little stones close to us, architecture, whatever. Make dead trees, crashed spaceship, characters, whatever you can come up with. Don't forget to add step 2 to your newly made objects, at least the major ones. (only tiny stones etc. can get away without it) If you got carried away at this point and made a detailed nice image, make sure the sky is as HQ as the rest of the picture. Sky affects the overall mood of your envo a lot, keep that in mind.
You need to know the basics to complete this stage well. Decent perspective, your objects of focus, and things like the closer something is to the viewer the sharper it usually gets. Background should (doesn't have to though) be blurry and slowly blending into the sky. Your objects of focus (interesting stuff in your picture) should be sharp and well defined, use small hard brushes. You should know how to use warm and cold colors, too.
5,
finishing even if it doesn't look as good as you hoped don't give up! It's a digital image, there is nothing easier than to adjust it! Experiment with colors, make them warmer, colder, or even entirely different for an interesting mood. Try darkening / brightening it / sharpening it, adding effects, whatever you can try try it. You never know. But if it's a crap it will usually just stay a crap no matter how hard you try.
If anything remains unclear, like how to get custom brushes or even what I mean by "brushes" just go ahead and ask. Have fun with digital art.